Essential Tools and Materials for a Smooth Door Replacement in Rockville, MD

Mechanic installs lock handles on room doors Mechanic installs lock handles on room doors at new house Door installation stock pictures, royalty-free photos & images

Installing an interior door can be a straightforward task when approached methodically. Whether you’re upgrading an old door or adding functionality and style to your space, following proper steps ensures a professional finish. This guide provides detailed steps, practical tips, and instructions for a seamless interior door installation process.

Step 1: Understand the Scope of Door Repair in Rockville, MD

Before diving in, it’s essential to understand what the installation involves: – Type of Door: Are you replacing an existing door, or installing one in a new frame? Pre-hung doors (with frames already attached) simplify the process. – Skill Level: Basic carpentry skills are helpful, but with careful attention to detail, beginners can handle this project. – Expected Time: Installing a single door generally takes 2–3 hours.

Step 2: Tools and Materials Checklist

Tools:

  • Measuring tape
  • Level
  • Screwdriver (manual or powered)
  • Hammer
  • Pry bar (for removing old hardware)
  • Saw (if trimming is necessary)

Materials:

  • New interior door (pre-hung or slab)
  • Hinges (if not included with pre-hung units)
  • Screws appropriate for your frame material
  • Shims for leveling and adjusting fit

Pro Tip: Lay out all tools before starting to avoid unnecessary delays.

Step 3: Prepare the Workspace

A clean and organized workspace ensures better results. Clear any obstructions around the doorway and protect nearby surfaces with drop cloths if needed.

Safety Considerations:

  1. Always wear safety glasses when using saws or drills.
  2. Ensure all tools are in good working condition before starting.

Step 4: Measurements Matter – Accuracy is Key

Precise measurements ensure a snug fit for your new door. Measure both the width and height of your current opening at multiple points to account for irregularities in older frames.

Measurement Point How To Measure Notes
Width Measure top, middle, and bottom Record smallest measurement
Height Measure left, middle, and right Record smallest measurement
Depth Check thickness of your frame Match this with your new door

If you’re working with a pre-hung unit, confirm that the frame dimensions align with your existing opening.

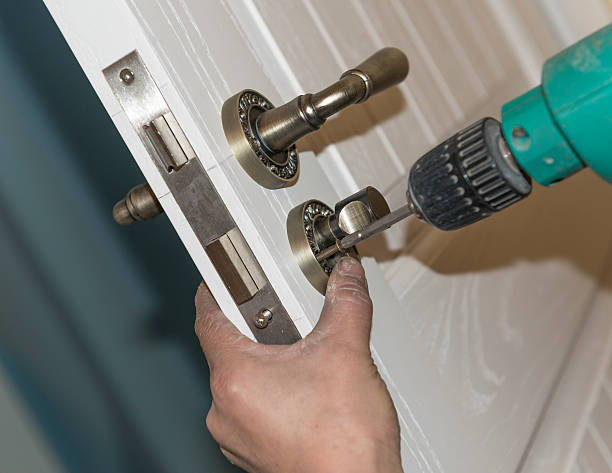
Step 5: Follow Installation Steps Methodically

  1. Use a screwdriver or drill to unscrew hinges from the old door.
  2. Remove any leftover hardware such as latch plates.
  3. Set it into place within the frame while ensuring proper alignment.
  4. Insert shims between the frame edges to adjust alignment as necessary.
  5. Attach hinges firmly using screws but avoid overtightening as it may warp movement later on.
  6. Test Functionality Before Finalizing Work: Before permanently securing everything ensure swinging motion feels smooth

Step-by-Step Guide to Door Installation in Rockville, MD

A successful interior door installation begins with proper preparation. Gathering all the necessary tools and materials ahead of time not only saves you time but also ensures a smooth, efficient process. Below is a detailed guide to help you assemble everything you’ll need before starting your project.

Essential Tools for Door Installation

  • Measuring tape: For accurate measurements of the door and frame dimensions.
  • Hammer: To remove old nails or taps during removal and installation.
  • Screwdriver (manual or electric): To secure screws for hinges, knobs, and other hardware.
  • Level: Ensures that your door hangs perfectly straight, avoiding uneven gaps or improper function.
  • Pencil or marker: For marking measurements and hinge placements.
  • Chisel: Useful for carving out mortises (recesses) in the door frame or jamb when needed.
  • Drill with bits: Speeds up the process of creating holes for screws or hardware installation.
  • Utility knife: For trimming excess material from paint, shims, or sealants if necessary.
  • Saw (if required): A circular saw or handsaw may be needed to trim doors if they don’t fit the frame.

Materials You’ll Need

  1. The new interior door
    Ensure you purchase a door that matches your frame size and style preferences.
  2. Hinges
    Opt for durable hinges that complement your door’s weight and design.
  3. Screws and nails
    Use rust-resistant screws sized appropriately for attaching hinges securely.
  4. Shims
    Wooden shims help align the door properly within an uneven frame.
  5. Door handles/knobs and latch mechanism
    Choose hardware that matches your interior decor while offering functionality.
  6. Wood filler (optional)
    For patching old screw holes in frames if needed during replacement jobs.
  7. Sandpaper (medium-grit)
    Smooth rough edges on both frames and doors before painting/staining.
  8. Paint, stain, or sealant (if applicable)
    Prepare decorative finishes to match existing room aesthetics after installation is complete.

Preparing Your Workspace

  1. Clear the doorway area of furniture, rugs, or obstructions.
  2. Lay down a drop cloth to protect flooring from scratches caused by tools or debris.
  3. Ensure proper lighting so you can work safely on small details like alignments and screw placements.
Tool/Material Purpose
Measuring tape Obtain exact measurements
Level Verify even alignment of door
Shims Adjust spacing within uneven frames
Drill & bits Install screws efficiently
Utility knife Trim materials as needed

Pro Tips

  • Double-check all measurements before purchasing your new door to avoid misfitting issues.
  • If you’re unsure about which tools might be missing from your kit, consult with an expert at your local hardware store who can provide recommendations based on your specific project requirements.
  • Label small items like screws in separate containers to avoid confusion during assembly later on.

By gathering these tools and materials beforehand while preparing a clutter-free workspace, you’ll set yourself up for success when tackling an interior door installation project smoothly from beginning to end without unnecessary halts due to missing components or mismatched equipment inventory issues.

View of on stacker wooden material door molding trim with new house of under construction New house under construction with on stacker wooden material door molding trim Door installation stock pictures, royalty-free photos & images

Gathering the Necessary Tools and Materials for a Smooth Door Installation

Before starting the process of installing a new interior door, it is essential to gather all the necessary tools and materials. Proper preparation will ensure that the installation process is efficient, less stressful, and results in a professional finish. Below is a guide to help you understand which tools and materials are required for a seamless door installation.

Essential Tools for Door Installation

  • Tape Measure: Ensures accurate measurements of the door frame, existing space, and new door.
  • Level: Critical for ensuring your door aligns properly and hangs evenly.
  • Screwdriver or Power Drill: Required for attaching hinges, handles, and other hardware.
  • Hammer: Useful for securing nails into place or removing old ones.
  • Chisel: Needed to carve out hinge recesses on the frame if adjustments are required.
  • Utility Knife: Helps with trimming building materials or cleaning up edges.
  • Saw (Hand Saw or Circular Saw): May be needed if you have to trim the door down to fit an irregular frame size.
  • Pry Bar or Crowbar: Assists in removing old doors and their associated hardware carefully.

Additional Tools That May Be Helpful:

  • Nail set
  • Wood shims
  • Clamps
  • Sandpaper or sanding block

Materials You Need

  1. Pre-Hung Door (or Slab Door): Depending on whether you’re replacing just the door slab or installing a pre-framed unit.
  2. Door Hinges: Ensure they match your existing frame or are suitable for the chosen door style.
  3. Screws/Nails: Keep both wood screws (for hinges) and finishing nails (for frames) at hand.
  4. Door Handle Set/Lockset: Select one that complements your new door’s design.
  5. Shims/Wedges: These will help align and balance your door during installation.
  6. Wood Filler/Paint/Paint Brushes/Stain (optional): For touch-ups after installation.
Tool/Material Purpose
Tape Measure For precise measurements
Level To ensure alignment
Screwdriver/Drill For securing hinges/hardware
Wood Shims To adjust alignment during install
Hammer & Nails Securing elements in place

Tips Before You Begin

  1. Inspect all materials before purchasing to ensure they’re free from defects like warping, cracks, or dents.
  2. Double-check measurements of your doorframe against those of your new door to avoid adjustments mid-installation.
  3. If painting or staining your new door, consider doing so before beginning installation – this makes it easier to work with flat surfaces.

By preparing all necessary tools and materials beforehand, you’ll be setting yourself up for success while minimizing delays caused by missing equipment during critical steps of the process.

Accurate Measurements and Preparation for Doors Rockville, MD

When it comes to installing an interior door, accurate measurements and thorough preparation are essential to achieve a seamless fit. Skipping or rushing this step can lead to alignment issues, gaps, or difficulties with the door’s operation. Below is a comprehensive guide on how to measure accurately and prepare your door for installation.

Tools Needed for Accurate Measurements

  • Measuring tape (preferably one with both metric and imperial units)
  • Carpenter’s square
  • Pencil or marker
  • Notepad (to record measurements)
  • Level

Steps for Taking Accurate Measurements

  1. Width: Measure the width of the door frame at three points—top, middle, and bottom. Record the smallest measurement as this will guide your door choice.
  2. Height: Measure from the floor to the top of the frame on both sides. If there’s a discrepancy between heights, use the shorter measurement.
  3. Depth: Check the jamb depth by measuring from one side of the frame’s face to the opposite side.
  4. Use a carpenter’s square at all four corners of your frame opening to ensure they form 90-degree angles. Any deviation may require adjustments during installation.
  5. Factor in any clearance needed based on flooring type (e.g., carpets or hardwood). Typically, a gap of ¾ inch is recommended between the bottom edge of the door and a carpeted floor.
  6. Note positions of existing hinges and latch holes if reusing old hardware. For new installations, mark where hinges should be placed based on standard heights (e.g., 7 inches from top and 11 inches from bottom).

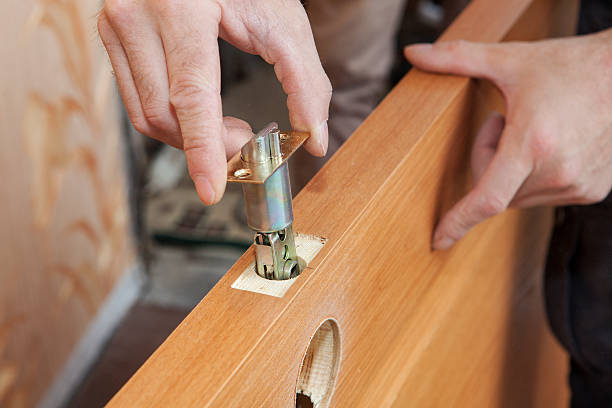
Preparing Your Door for Installation

Adjusting Door Dimensions

  • If necessary, trim edges using a saw to match your recorded measurements.
  • Always sand down edges after trimming to create smooth surfaces.

Pre-drilling Holes

  • Mark hinge locations on both door and frame using pre-measured guidelines.
  • Pre-drill pilot holes in these areas to help with easier screw insertion during installation.

Test Fitting

  • Place your new door within its frame before permanently attaching any hardware. This allows you to confirm fitment and make adjustments if required.

Table: Common Measurement Standards

Measurement Area Standard Interior Doors Notes
Width 24″ – 36″ Check smallest width in frame
Height 80″ – 96″ Ensure flooring is accounted
Jamb Depth 4 ⅝” Common depth; verify yours

By meticulously measuring and preparing both your doorway and new door, you lay down the foundation for an easy installation process with fewer errors or complications later on.

Professional worker install garage doors at new house Fixing and replacement concept. Cropped view of professional worker using electric screwdriver and install new garage door system in house under construction Door installation stock pictures, royalty-free photos & images

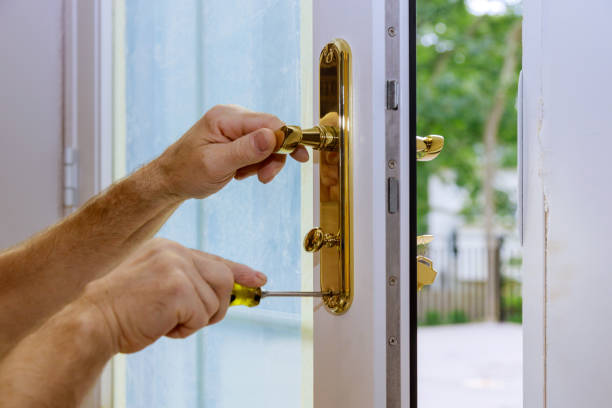
Step-by-Step Guide from a Door Company in Rockville, MD: Removing Old Hardware and Installing a New Door

Properly removing the old door and hardware is a key step to ensure a seamless new door installation. By following the correct process, you can avoid potential damage to the door frame, walls, or surrounding areas. Below is a detailed guide on how to remove your old door and prepare your space for the new one.

Tools You’ll Need

Before beginning, gather the following tools:
– Screwdriver (manual or powered)
– Hammer
– Pry bar
– Utility knife
– Tape measure
– Safety goggles and gloves

Having these tools on hand will streamline your work while enhancing safety during the process.

1. Inspect the Existing Door and Frame

Take time to check for any structural damage around the frame or hinges. Cracks, warping, or weakened areas should be addressed before installing a new door to ensure stability.

2. Remove the Door from Its Hinges

  • Open the door fully to allow easier access.
  • Using a hammer and screwdriver (or hinge pin remover tool), carefully tap up on each hinge pin until it is loose enough to pull out by hand. Start with the bottom hinge and work upward for better control over weight distribution.
  • Once all pins are removed, lift the old door off its hinges and set it aside carefully.

3. Remove Old Hardware (Optional)

If you are replacing hardware such as hinges, doorknobs, or locks:
1. Unscrew all components using an appropriate screwdriver. 2. Keep screws organized in small containers if they will be reused elsewhere. 3. Use caution not to scratch surrounding surfaces when removing hardware parts.

4. Cut Sealed Edges with a Utility Knife

Doors that have been painted over may stick at edges where paint overlaps onto frames or walls:
– Run a utility knife along these seals for smooth detachment without peeling surrounding paint unnecessarily.

5. Pry Off Trim or Casing (If Needed)

For certain installations requiring deeper access into wall cavities:
1. Use a pry bar gently around trims/casings starting from corners. 2.Place thin wood-shims behind bars’ leverage points preventing direct pressure-related dents formed against existing drywall alongside finishes preserving reusability intact whenever feasible).

Component Removal Tool Notes
Hinge Pins Hammer/Screwdriver Start from bottom; avoid misalignment issues
Doorknob Screwdriver Keep original screws organized for later use
Trim/Casing Pry Bar Add protective shims behind voids


Step-by-Step Guide to Installing Doors in Rockville, MD for Beginners

Carpenter fixes interior door handles using screwdriver. Installer fixes door knob with lock using screwdriver. Door installation stock pictures, royalty-free photos & images

Here’s a detailed step-by-step approach to help you successfully install an internal door.

Tools and Materials You’ll Need

  • Tape measure
  • Screwdriver or electric drill
  • Hammer
  • Saw (hand saw or circular saw)
  • Wood chisel
  • Spirit level
  • Pencil
  • New internal door
  • Hinges (usually two or three per door)
  • Screws (appropriate size for hinges)
  • Door handle and latch set

Step-by-Step Guide to Installing Internal Doors

  1. Measure Your Door Frame:
    Before purchasing your new door, take precise measurements of the existing door frame. Measure the height, width, and depth of the frame to ensure the new door will fit correctly.
  2. Prepare Your Workspace:
    Clear the area around your workspace to allow for easy movement and ensure you have adequate lighting. Place your tools within reach to avoid interruptions once you start working.
  3. Check the New Door’s Fit:
    Place the new door into the frame without attaching anything yet. Check if it fits snugly or requires trimming.
  4. Use a pencil to mark where adjustments are required.
  5. Remove material gradually using a saw or planer.
  6. Mark and Attach Hinges: To properly secure your internal door:
  7. Lay the door flat on a workbench or sawhorses.
  8. Position hinges on both sides of the door (typically about six inches from both ends). Mark their outline with a pencil.
  9. Use a chisel to create shallow recesses for each hinge on both the door edge and frame.
  10. Securely screw hinges onto both surfaces.
  11. Install Door Hardware: Next, fit essential hardware like handles and latches:
  12. Follow manufacturer instructions for drilling holes in precise locations.
  13. Insert latch mechanisms into pre-drilled spaces before attaching handles securely.
  14. Hang Your Door: With hinges now attached:
    • Lift/align doors carefully** (Tighter tightened anything else Sections

Expert Door Installation Rockville, MD: Perfectly Fitting Your New Door

Proper preparation and accurate cutting of a new door are crucial steps to ensure a seamless installation. A well-fitted door not only enhances the overall aesthetics of your space but also ensures smooth functionality. Below is a detailed guide to help you cut and prepare your new door to fit the opening perfectly.

Essential Tools and Materials from a Door Company in Rockville, MD

  • Tape measure
  • Straight edge or ruler
  • Pencil or marking tool
  • Saw (circular saw or handsaw)
  • Sandpaper (medium and fine grit)
  • Plane (manual or electric)
  • Clamps (optional)
  • Safety gear: goggles, gloves, ear protection

Tips for Measuring Your Door Opening for Door Repair Rockville, MD

  1. Measure the Frame Dimensions: Start by measuring the height, width, and thickness of the door opening. Measure in multiple spots to account for any irregularities in the frame.
  2. Account for Clearance: Leave a small clearance of 2–3mm on each side of the door for smooth movement. Additionally, allow about 10mm at the bottom if installing over flooring.
  3. Double-check Your Measurements: Always verify your dimensions before making any cuts.

Marking and Cutting the Door

  1. Mark the Cut Lines: Lay your new door flat on sawhorses or a sturdy surface. Using your measurements, mark where adjustments need to be made with a pencil.
  2. Use a Straight Edge: Place a straight edge along the marks to ensure accuracy when cutting.
  3. Secure Before Cutting: Clamp down the door if possible to prevent movement during cutting.
  4. For minor adjustments along edges, use an electric plane for controlled trimming.
  5. For larger reductions in size, use a circular saw with a fine-tooth blade for clean cuts.

Tip: If you’re using a saw, cut slowly and steadily to prevent chipping or splintering.

Smoothing Edges

  1. After cutting, sand down all edges using medium-grit sandpaper followed by fine-grit sandpaper for smoothness.
  2. Pay special attention to corners where splinters may occur during cutting.
Sandpaper Grit Purpose Recommended Use
Medium (120) Remove rough surfaces After initial cuts
Fine (240+) Finish smoothing edges Final touch-ups

Adjusting Thickness if Necessary

Some doors may require minor adjustments in thickness if they don’t match your frame size exactly.

  1. Use an electric plane along areas that feel too tight when tested against the frame.
  2. Remove material gradually and recheck frequently until it fits perfectly.

Sealing Cut Edges

Exposed wood edges can absorb moisture over time, leading to warping or damage.

  1. Apply wood sealant or primer on all freshly cut surfaces.
  2. Allow it to dry completely before proceeding with installation.

By carefully measuring, accurately cutting, and properly sealing your new door during preparation, you’ll ensure it fits perfectly into its frame while maintaining durability over time.

Cutting and Preparing a New Door to Fit Your Door Opening Perfectly

Properly cutting and preparing a new door to fit your door frame is a crucial step in any door installation. Here’s how you can ensure your new door fits perfectly into your existing opening.

Tools You’ll Need

  • Measuring tape
  • Pencil or marking tool
  • Circular saw or hand saw
  • Sandpaper (medium and fine grit)
  • Wood plane (optional)
  • Clamps
  • Straight edge or ruler
  • Safety gear (goggles, gloves)

Having these tools ready will save time and ensure the work is seamless.

Steps to Cut and Prepare Your Door

  1. Measure the Door Opening
    To achieve an accurate fit, measure the width, height, and thickness of your door frame. Write down these dimensions for reference. Measure at multiple points (top, middle, bottom) to account for any irregularities in the frame.
  2. Mark Your Cut Lines
    Using your measurements as a guide, mark cut lines on the new door with a pencil. Double-check these marks against the frame before making any cuts.
  3. Use a circular saw or hand saw to carefully trim along the marked lines.
  4. Always follow manufacturer recommendations regarding trimming limits — cutting too much could void warranties or compromise structural integrity.
  5. For small adjustments or fine-tuning, use a wood plane instead of a saw.
  6. Sand Down Edges
    After cutting, smooth any rough edges with medium-grit sandpaper. Follow up with finer grit sandpaper for a polished finish that prevents splintering.
  7. Test Fit
    Place the trimmed door in its frame to test for fit:
  8. Ensure there’s an even gap of about 2–3 mm between the edges of the door and frame.
  9. If adjustments are needed, repeat trimming/sanding until satisfied.

Important Considerations

Issue Solution
Uneven Frame Use shims during installation to compensate for irregularities in older frames.
Hollow-Core Doors Avoid cutting large sections from hollow-core doors as this may weaken their structure; stick close to manufacturer guidelines.
Preserving Veneers When working with veneered doors, use masking tape along cut lines before sawing to prevent chipping of the veneer layer.

Final Preparations Before Installation

  1. Apply wood primer or sealant on trimmed edges if necessary; this step prevents moisture absorption that can cause warping over time.
  2. Check alignment once more by placing it back in position.
  3. Proceed by marking hinge positions if they aren’t pre-drilled already—this will make hanging easier later on.

By following these steps methodically and accurately, you’ll ensure not only that your new interior door looks great but also operates smoothly within its designated space without unnecessary gaps or friction points throughout its lifespan.

Beautiful woman leaving her house and locking the door using a home automation system Beautiful woman leaving her house and locking the door using a home automation system Door installation stock pictures, royalty-free photos & images

Essential Tips for Fitting Hinges During an Internal Door Installation

When installing an internal door, fitting hinges correctly is a crucial step to ensure that the door functions smoothly and aligns properly with the frame. Proper hinge installation not only enhances the door’s functionality but also extends its longevity. Below are essential tips and techniques to help you fit hinges accurately during your internal door installation project.

Tools and Materials Needed

  • Screwdriver or drill (preferably with a screwdriver bit)
  • Chisel (sharp, preferably 1-inch wide)
  • Hammer or mallet
  • Measuring tape
  • Pencil or marking tool
  • Hinges (ensure they are the right size and type for your door)
  • Screws (usually provided with the hinges)

Having these tools ready will ensure a smooth workflow during the installation process.

Choosing the Right Hinges

Selecting the appropriate hinges is important for both functionality and aesthetics.

  1. Hinge Type:Some common types include butt hinges, concealed hinges, and spring-loaded self-closing hinges. Butt hinges are most commonly used for interior doors.
  2. Material:Opt for durable materials like stainless steel or brass to avoid rusting over time.
  3. Size:Standard interior doors often require 3-inch or 4-inch hinges, but thicker or heavier doors may need larger sizes.

Marking Hinge Placement

  1. Determine Placement on Door Frame:Typically, two standard hinge positions are used: one at about 6–7 inches from the top of the door and another approximately 9–10 inches from the bottom.
  2. Transfer Marks Onto Door Edge:Use a pencil to mark hinge positions on both the door edge and corresponding spots on the frame.
  3. For taller doors or added stability requirements, consider adding a third hinge midway between your top and bottom hinge positions.

Cutting Hinge Mortises

  1. Using your pencil marks as guides, place one side of each hinge flush against its position on both surfaces (door & frame). Then trace hinged outlines inside those areas.

A Comprehensive Guide to Hanging Your Interior Door Correctly

This guide walks you through the essential steps to hang your interior door correctly, ensuring it functions smoothly and enhances the aesthetics of your space.

Tools You’ll Need

Before getting started, gather the following tools:
Measuring tape: For accurate measurements of your door and frame.
Screwdriver or drill: To secure hinges and hardware in place.
Level: Ensures proper alignment of the door during installation.
Chisel: Helps carve out recesses for hinges if needed.
Pencil: For marking hinge positions accurately.
Sandpaper or planer: To adjust or smooth edges for a perfect fit.

Step 1: Confirm the Door Fit

  1. Check dimensions:There should be slight gaps (around 2mm) on each side for smooth operation without rubbing against the frame. Trim if necessary using a planer or circular saw.
  2. Inspect clearance:Ensure there’s enough space at the bottom of the door to clear flooring (e. g. , carpet or hardwood). If trimming is required, sand edges afterward for a clean finish.

Step 2: Position Hinges Correctly

Fitting hinges properly ensures that your door opens and closes smoothly without squeaking or sagging over time.

  1. Mark hinge placement:Mark these positions with a pencil on both sides of your new door.
  2. Cut hinge recesses:Use a chisel to cut shallow recesses into both the door edge and frame where each hinge will sit flush with the surface.
  3. Attach hinges to the door:Securely fasten each hinge leaf onto its corresponding position on your door using screws.
  4. Align hinges with frame:With assistance if needed, align and mark where they’ll attach inside your doorway frame.

Step 3: Hang Your Door

  1. Lift or hold up your prepared door so that its attached hinges align precisely with their marked positions on the frame.
  2. Insert screws loosely into one side first; this allows adjustments before tightening everything fully.
  3. Does it open/close freely?
  4. Are weight distributions balanced equally upon fixing secondary points?

By addressing such basics upfront now avoids failures later such !

Installing a lock Installing a lock Door installation stock pictures, royalty-free photos & images

Beginner-Friendly Guide to Door Replacement Rockville, MD: Can You Install Interior Doors Yourself?

Installing interior doors can seem like a daunting task, especially if you’re new to home improvement projects. Below is a beginner-friendly guide to help you decide whether installing an interior door yourself is the right choice and how to get started.

Assessing Your Skill Level and Tools

Before deciding to install an interior door yourself, evaluate your current skill level and ensure you have the necessary tools.

  • Have you worked on DIY projects before?
  • Are you comfortable using basic hand tools like screwdrivers, chisels, and drills?
  • Do you have a basic understanding of measurements and leveling?

If you’re confident in these areas or willing to learn as you go, installing an interior door may be within your capabilities.

Steps for DIY Door Installation

  1. Remove the Existing Door (if applicable):
    Start by unscrewing hinges from the current door using a screwdriver or drill. Lift the old door out of its frame carefully.
  2. Inspect and Measure:
    Examine your existing frame for damage or uneven surfaces. Use a tape measure to record dimensions such as height, width, and depth of the opening.
  3. Prepare Your New Door:
    If necessary, trim down your new door using a saw so it fits snugly within the frame. Sand edges for smoothness.
  4. Position Hinges:
    Mark hinge locations on both the new door and frame. Use a chisel to create recesses where each hinge will sit flush against both surfaces.
  5. Hang the Door:
    Secure one side of each hinge onto the edge of your new door first. Then align it with your frame before fastening screws into place on that side as well.
  6. Install Hardware:
    Attach handles or knobs according to manufacturer instructions after ensuring proper alignment during test swings of completed assembly work beforehand.

Pros of DIY Interior Door Installation

  • Cost Savings:Hiring professionals can be expensive; doing it yourself eliminates labor costs.
  • Skill Building:You’ll gain valuable experience in home improvement.
  • Flexibility:Work at your own pace without relying on others’ schedules.

When To Call A Professional

  • Uneven frames requiring extensive leveling or repairs
  • Specialty doors (e. g.
  • Lack of proper tools or experience leading potentially unsafe attempts

How Long Does It Take and What Does It Cost to Install an Interior Door?

When installing an interior door, understanding the time and cost involved is critical for effective planning. Both factors can vary depending on your level of expertise, the tools at your disposal, and the specific requirements of the project.

Average Time to Install an Interior Door

The time it takes to install an interior door depends on several factors including whether you are replacing an old door or working with a new frame.

Task Estimated Time
Removing an old door 15-30 minutes
Preparing the new door (cutting/trimming) 20-45 minutes
Installing hinges 10-20 minutes
Hanging and aligning the door 20-30 minutes
Installing hardware (handle/lock) 10-15 minutes

Key Considerations:Experience Level:If you’re new to DIY tasks, allocate extra time for each step.Type of Door:Pre-hung doors are faster to install compared to slab doors.Adjustments Required:Older frames may require sanding or adjustments that increase installation time.

On average, if you’re reasonably experienced with basic tools, installing one interior door from start to finish could take around 2–4 hours. Beginners might need closer to half a day.

Cost of Installing an Interior Door

Costs can vary based on material choice, labor rates (if hiring a professional), and additional hardware requirements.

Materials:
  1. Hollow core doors: $50–$150
  2. Solid wood doors: $200–$500+
  3. Hinges: $5–$15 per hinge
  4. Door Handles/Locks: $20–$100 depending on design and quality
Tools:

If you don’t already own some essential tools, you may need: – Circular saw or hand saw ($50–$150) – Screwdrivers and drill ($30–$100) – Level and measuring tape ($10–$30)

Professional Labor Costs:

Hiring a professional can increase costs significantly but ensures precision: – Typical labor rates: $75–$150 per hour – Total professional installation cost: $200–$400 per door

Tips for Saving Time and Money

  1. Opt for Pre-Hung Doors
    Pre-hung doors come with hinges attached and fit into their own frame, reducing installation complexity.
  2. Reuse Existing Hardware
    If hinges or handles are in good condition, reusing them can help cut costs.
  3. Plan Ahead
    Measure twice before trimming or cutting anything—this minimizes errors requiring rework.
  4. DIY Where Possible
    If you have basic carpentry skills, doing it yourself saves labor costs entirely.

By having realistic expectations about time investment and budgeting for materials or labor expenses upfront, you’ll ensure a smoother installation process without unexpected delays or financial surprises.


Beginner’s Guide to Door Installation Rockville, MD: Can You Replace a Door Frame Yourself?

Shallow focus of the keyhole seen on a newly fitted double glazed generic door Leading to a patio area and enclosed garden. Door installation stock pictures, royalty-free photos & images

Replacing a door frame may sound like a challenging task, but with the right approach and tools, it can be completed efficiently. Whether you’re upgrading an old frame or dealing with damage caused by wear and tear, following these steps will help you achieve a seamless installation.

Step 1: Assess the Condition of the Existing Door Frame

Before starting, inspect the current door frame carefully. Look for:
– Cracks or rot in wooden frames
– Warping or bending of the material
– Loose screws or nails that compromise structural integrity

If the frame is damaged beyond repair, removal and replacement are necessary.

Step 2: Gather Necessary Tools and Materials

Tools:
– Hammer
– Screwdriver (manual or power drill)
– Level tool for alignment
– Measuring tape
– Pry bar
– Saw (hand saw or circular saw)

Materials:
– Replacement door frame kit (pre-cut if possible)
– Screws and nails appropriate for your wall type (e.g., wood, drywall)
– Wood filler or caulk for sealing gaps
– Shims to ensure proper alignment

Ensure safety gear like gloves and protective eyewear are also on hand.

Step 3: Remove the Old Door Frame

  1. Detach the Door: Unscrew and remove the hinges to take off the door panel. Set it aside.
  2. Take Out Trim Pieces: Use a pry bar to carefully remove casing trim around the door without damaging surrounding walls. Set trim pieces aside for reuse if they’re still in good condition.
  3. Loosen Screws/Nails: Detach screws securing parts of the old frame to studs in your wall. If nails were used instead, cut them with a reciprocating saw where accessible.
  4. Extract Frame Sections: Carefully pull out side jambs (vertical pieces), head jamb (horizontal top piece), and sill if present.

Step 4: Prepare Wall Opening for New Frame

After removing the old frame, clean up debris from the opening. Check that it’s square and level using a measuring tape and level tool. This step ensures your new door aligns correctly when installed.

Key Preparations Include:
| Task | Why It’s Important |
|———————–|——————————————————-|
| Remove leftover nails/screws | Prevents interference with new installation | | Sand rough edges | Creates smooth surfaces for better fit | | Measure dimensions | Ensures replacement frame matches opening size |

Step 5: Install New Door Frame

  1. Set Side Jambs in Place: Align vertical jambs on each side of wall opening using shims as needed to maintain level placement.
  2. Attach Head Jamb: Secure top piece horizontally across jamb sides while double-checking alignment.
  3. Fasten Frame to Studs: Insert screws or nails into pre-drilled holes where required—ensure tight connection without over-tightening.
  4. Check Fitment Regularly: Use level tools frequently during this process so no part is out-of-square due misalignment!

Step 6 : Finish Details

Repeat

Expert Tips from a Door Company in Rockville, MD on Replacing an Internal Door Frame

Replacing an internal door frame may seem like a challenging task, but with the right approach and tools, it can be done efficiently. This guide outlines the necessary steps and considerations to ensure a seamless replacement process.

Tools and Materials You’ll Need

  • Hammer
  • Pry bar
  • Tape measure
  • Level
  • Screwdriver (manual or powered)
  • Saw (hand saw or circular saw)
  • Drill with bits
  • Chisel
  • Replacement door frame kit or individual timber pieces
  • Wood screws or nails
  • Shims (wooden or plastic wedges)
  • Wood glue (if needed)
  • Sandpaper or sanding block
  • Paint, stain, or finish (optional)

Having these items on hand will save time during installation.

Steps to Replace an Internal Door Frame

  1. Start by removing the door from its hinges. Use a screwdriver to loosen the hinge screws and carefully lift the door away.
  2. Use a pry bar or hammer to remove the old frame, including any trim, casings, nails, and screws.
  3. Be cautious not to damage surrounding walls during this process.
  4. Inspect the wall opening for damages such as cracks or uneven surfaces. Repair these areas before proceeding.
  5. Measure the dimensions of the opening—height, width, and depth—to ensure your new frame fits accurately.
  6. If you’re working with raw timber rather than a pre-cut kit, cut your materials according to your measurements.
  7. Sand down any rough edges for a smooth finish.
  8. Place each piece of your new door frame into position in the opening.
  9. Use shims around all sides of the frame to ensure it’s level and plumb before securing it in place. | Position | Checking Technique | |———————-|——————————–| | Vertical Alignment | Use a level on each side | | Horizontal Alignment | Check along top crosspiece |
  10. Once aligned properly: a) Securely fasten each piece using screws or nails at regular intervals. b) Trim excess shim material protruding from under edges.
  11. Attach Trim & Finishing Touches
    After ensuring everything functions properly: finish attaching trims edging sand gaps

How to Handle Door Repair Rockville, MD: Replacing an Internal Door Frame

Replacing an internal door frame is a task that requires precision and preparation. Whether your current frame is damaged, warped, or outdated, this guide will walk you through the process step by step to achieve a professional finish. With proper tools, careful measurements, and attention to detail, you can successfully replace the door frame and enhance the overall functionality and appearance of your interior space.

Tools and Materials You’ll Need

Tools: – Measuring tape
– Hammer or mallet
– Level
– Screwdriver or drill
– Utility knife
– Pry bar
– Wood chisel
– Saw (hand saw or circular saw)

Materials: – New door frame (pre-cut or custom-sized)
– Shims
– Wood screws or nails
– Wood filler (if needed)
– Sandpaper or sanding block
– Paint or stain (optional)

Step-by-Step Instructions

Follow these steps for a seamless internal door frame replacement.

  1. Measure Your Existing Door Frame
    Accurate measurements are crucial for selecting the right-sized replacement frame. Use a measuring tape to record:
  2. Width of the opening (at three points: top, middle, bottom).
  3. Height of the opening from floor to header.
  4. Depth of the wall (to match your new frame).
  5. Remove the Existing Door Frame
    Start by taking down the door from its hinges. Then use a utility knife to cut along any caulking or paint sealing the old frame to the wall. Use a pry bar carefully to remove trim pieces and old fasteners without damaging surrounding drywall.
  6. Inspect and Prepare the Opening
    Once you’ve removed all components of the old frame, inspect the rough opening for signs of damage such as rot or uneven surfaces. Replace any damaged wood parts and clean up debris for a stable foundation before installing your new frame.
  7. Begin with securing one side jamb in place using shims for leveling. Ensure it’s vertical using a level tool.
  8. Attach it temporarily using screws but keep adjustments possible until alignment confirmed overall step completion next.j

Wood door lock systems security protection for apartment. Handle installed on wood door lock systems security protection for apartment. Door installation stock pictures, royalty-free photos & images

Step by Step Instructions for Installing External Door Frames

Installing an external door frame requires precision and careful attention to detail to ensure a secure fit and optimal performance. By following these step-by-step instructions, you can complete the job efficiently and effectively.

Tools and Materials You’ll Need

Tools:
  • Hammer
  • Level
  • Tape measure
  • Power drill with appropriate drill bits
  • Screwdriver set
  • Saw (circular saw or hand saw)
  • Pry bar
  • Caulking gun
Materials:
  • New external door frame unit
  • Screws or nails (specify as per manufacturer’s recommendation)
  • Shims
  • Weather-resistant caulk or foam insulation
  • Exterior-grade paint or stain (if applicable)

Steps to Install an External Door Frame

  1. Start by removing the existing door from its hinges. Use a screwdriver or drill to unscrew the hinge pins, then carefully lift the door out of place. Set it aside.
  2. Using a pry bar, remove the old trim around the door opening without damaging surrounding walls.
  3. Detach and remove any nails, screws, or fasteners securing the old frame in place.
  4. Remove any remaining debris from the rough opening.
  5. Measure the dimensions of the rough opening to ensure it matches the size of your new door frame. If adjustments are needed, use a saw to widen or modify it.
  6. Clean out any dust or debris inside the opening.
  7. Check that the rough opening is level and square by using a level tool. Uneven surfaces can lead to improper installation.
  8. Place your new external door frame into the rough opening carefully, ensuring it is centered within the space.
  9. Insert shims at various points around all sides of the frame to align it properly and maintain plumb positioning.
  10. Double-check alignment using your level; make adjustments as needed.
  11. Once aligned perfectly, use screws or nails (preferably corrosion-resistant for outdoor use) to secure each side of your frame into place through pre-drilled holes.
  12. Be sure not to overtighten fasteners as this could cause warping.
  13. Fill any gaps between your newly installed frame and wall using weather-resistant caulking or foam insulation for effective thermal sealing.
  14. Smooth out caulk lines with your finger or a caulk-smoothing tool for an even finish.
  15. Attach exterior-grade trim around your newly installed door frame for added durability as well as aesthetic appeal.
  16. Secure with nails/screws appropriately spaced apart for long-term stability.
  17. Paint/Stain The Frame (Optional)
    If necessary based on material types like untreated wood: Apply primer first followed by exterior-safe paint/stain products ensuring protective coatings longer exposure vs environments! Dry appropriately btwn coats

Answers to Frequently Asked Questions About Replacing a Door Frame

Replacing a door frame is a common task in home improvement projects, but it can raise many questions for those new to the process. Here are answers to some frequently asked questions that will help guide you through replacing a door frame effectively.

1. What Are the Signs That My Door Frame Needs Replacement?

  • Warping or Cracking: Over time, wood can warp or crack due to moisture damage or structural stress.
  • Rot or Mold: If the frame has been exposed to water or humidity, rot and mold can develop, weakening the structure.
  • Difficulty Closing/Openings: Misalignment caused by shifting foundations can prevent doors from opening and closing smoothly.
  • Visible Damage from Pests: Termite infestations often result in visible damage that compromises the doorframe’s integrity.

2. What Tools Will I Need for Replacing a Door Frame?

  • Hammer and pry bar
  • Screwdriver or power drill
  • Measuring tape
  • Carpenter’s square for accurate angles
  • Level to ensure alignment
  • Saw (hand saw or reciprocating saw) for cutting old frames

Optional but helpful tools include shims for leveling and wood filler for minor repairs.

3. Can I Replace a Door Frame Without Replacing the Door?

  1. Measure your existing door carefully.
  2. Purchase a pre-hung kit or custom-cut frame that aligns with those measurements.
  3. Consider any aesthetic factors like paint color and hardware compatibility.

4. How Long Does It Take To Replace a Door Frame?

Experience Level Estimated Time Needed
Beginner 4–6 hours
Intermediate 2–4 hours
Professional 1–2 hours

Unforeseen issues like misalignments or hidden rot may increase the duration of your project.

5. Do I Need Permits To Replace My Door Frame?

In most cases, replacing an interior or exterior door frame doesn’t require permits since it’s considered minor work. However, if you’re making structural changes (widening an opening, installing new headers), check local building codes as permits might be necessary.

6. Should I Use Wood or Metal Frames?

Wood Frames: – Aesthetic appeal with natural charm – Easier to customize – Prone to rot if not properly maintained

Metal Frames: – Higher durability and strength – Resistant to pests and moisture – Often used in commercial applications

Final Tips for Success

To ensure your replacement project runs smoothly: 1. Always double-check measurements before cutting materials. 2. Use shims during installation for proper leveling. 3. Inspect surrounding areas (e.g., walls) for hidden damages before attaching the new frame.

Addressing these frequently asked questions will help you approach replacing your door frame with greater confidence and efficiency while avoiding common pitfalls associated with such tasks.

Answers to Frequently Asked Questions About Replacing a Door Frame

Replacing a door frame can seem like a daunting task, but with the right information and preparation, it becomes much more manageable. Below are answers to some of the most commonly asked questions about replacing door frames. This guide is intended to help you better understand the process, materials, and considerations involved.

1. How Do I Know if My Door Frame Needs Replacing?

  • Visible damage: Cracks, warping, or rotting wood.
  • Structural issues: The frame no longer aligns properly with the door.
  • Drafts or leaks: Air or water entering through gaps around the frame.
  • Repeated repairs: If you’ve had to fix your frame multiple times, replacement may be more cost-effective.

2. What Types of Tools Are Needed for Replacing a Door Frame?

  • Measuring tape
  • Level
  • Pry bar
  • Hammer
  • Screwdriver or power drill
  • Handsaw or reciprocating saw (if modifications are needed)
  • Wood shims

Additional materials such as wood filler, caulk, and primer may also be necessary depending on the project.

3. Can I Replace Just Part of the Frame Instead of the Entire Thing?

Damage Type Solution
Small cracks Use wood filler and sand down any rough edges.
Minor rot Cut out affected areas and replace with new wood.
Loose joints Reinforce with screws or nails for added stability.

However, if damage is extensive—such as widespread rot or warping—it’s often better to replace the entire frame.

4. What Type of Material Should I Choose for My New Door Frame?

  • Wood: A classic choice for both interior and exterior applications; versatile but prone to rot without proper sealing.
  • Metal: Durable and weather-resistant; often used for commercial projects or modern aesthetics.
  • Composite: Combines durability with low maintenance requirements; resistant to moisture and pests.

Consider factors like location (interior vs exterior), budget, and design preferences when selecting your material.

5. How Long Does It Take to Replace a Door Frame?

  • For beginners: Around 4–6 hours if following step-by-step instructions carefully.
  • For experienced DIYers: Approximately 2–4 hours.
  • Hiring professionals: The job can typically be completed in under two hours.

Keep in mind that unforeseen complications like uneven walls or unexpected structural issues could extend these timelines.

6. Do I Need Professional Help for This Project?

DIY Replacement Is Possible If:
– You have basic carpentry skills.
– The damage is limited to one section of the frame.
– You’re working with standard-sized doors.

Hire Professionals If:
– You’re dealing with structural damage beyond cosmetic wear-and-tear.
– Custom fitting is required due to unusual dimensions.
– Electrical wires or plumbing run through adjacent walls that could be disturbed during installation.

Replacing a door frame requires careful planning but can dramatically improve both functionality and aesthetics in your space when done correctly. By understanding these FAQs, you’ll be better prepared to tackle this home improvement project confidently.

Close-up carpenter hands door lock installation. Installation locked interior door knobs, close-up woodworker hands install lock. Door installation stock pictures, royalty-free photos & images

Step-by-Step Guide to Replacing Door Frames for a Seamless Installation in Doors Rockville, MD

Replacing a door frame may seem like an intimidating task, but with the right tools, preparation, and understanding of the process, it can be manageable for beginners. This guide will walk you through the essential considerations and steps to ensure a successful door frame replacement.

Assessing the Scope of the Project

  • Condition of the Current Frame: Is it damaged from moisture, rotting wood, or long-term wear and tear?
  • Type of Frame: Internal door frames are generally simpler to replace than external ones due to weatherproofing requirements.
  • Tools and Materials: Do you have access to basic carpentry tools such as a saw, level, measuring tape, chisel, drill, and screws?
  • Time Commitment: Replacing a door frame can take anywhere from 2–5 hours depending on experience and complexity.

Tools You’ll Need

Tools Purpose
Measuring tape Ensuring accurate measurements
Pry bar or crowbar Removing the old frame
Level Verifying alignment during installation
Hammer or mallet Securing nails or knocking components
Circular saw or hand saw Cutting new frame pieces to size
Chisel Fitting hinges into place
Drill with bits Pre-drilling holes for screws

Additionally, you’ll need materials such as wood for the new frame (if not pre-purchased), nails or screws, shims for alignment adjustments, and caulk for sealing if it’s an external frame.

Steps to Replace a Door Frame Yourself

  1. Start by taking out the existing door by unscrewing its hinges.
  2. Use a pry bar to carefully remove trim around the old frame.
  3. Detach any nails or screws securing the current frame in place.
  4. Measure both the rough opening (the gap in your wall) and your replacement door.
  5. Ensure that your new materials match these dimensions with minimal gaps.
  6. Cut vertical jambs (side pieces) and horizontal head jamb (top piece) according to measurements.
  7. Position each piece in place using shims as necessary to ensure they are plumb (vertically straight).
  8. Attach each piece using nails or screws at regular intervals.
  9. Check alignment frequently using a level.
  10. Mark hinge locations on both jambs and doors before chiseling out spaces for them.
  11. Screw hinges securely into place before reattaching your door.
  12. Add trim around edges for aesthetic appeal.
  13. If working on an exterior doorframe, seal all gaps with weather-resistant caulk.

Challenges You Might Encounter

  • Uneven wall surfaces requiring more shimming.
  • Difficulty removing old nails embedded in studs.
  • Adjusting hinge placement if misaligned during installation.

When to Hire Professional Help

If you’re working on an exterior doorframe that requires precise weatherproofing or dealing with structural damage beyond just replacing wood components, it might be wise to consult a professional carpenter or contractor. Similarly, projects involving heavy doors like solid core designs may benefit from expert handling due to their weight.

By understanding these challenges ahead of time and approaching each step methodically, even first-time DIYers can confidently replace their own door frames with satisfying results.

How to Handle Door Replacement Rockville, MD: A Beginner’s Guide

Replacing a door frame might seem like a daunting task, especially for beginners, but with the right tools, knowledge, and approach, it’s possible to tackle this project on your own. While professional assistance is always an option, doing it yourself can save money and give you the satisfaction of completing a home improvement task. Below is a comprehensive guide to help you decide if this project is for you and how to approach it effectively.

Assessing Your Skill Level

Before diving into this project, ask yourself the following:
– Have you ever worked on other home improvement projects?
– Are you comfortable using power tools like drills or saws?
– Do you have patience and attention to detail for measurements and alignment?

If the answers are mostly “yes,” replacing a door frame might be manageable for you. If you’re unsure about certain aspects, consider practicing with smaller woodworking projects before committing.

Tools You Will Need

Basic Tools:

  • Measuring tape
  • Hammer or rubber mallet
  • Screwdrivers (flathead and Phillips)

Power Tools (optional but helpful):

  • Power drill
  • Circular saw or reciprocating saw

Additional Materials:

  • Nails or screws appropriate for your frame material
  • Wood glue or caulk
  • Shims
  • Sandpaper

Having these items ready before starting can save time and hassle during installation.

Steps to Replace a Door Frame Yourself

  1. Start by removing the door from its hinges. Use a hammer and screwdriver to carefully detach hinge pins.
  2. Remove any trim or casing around the existing frame using a pry bar.
  3. Unscrew or cut through nails securing the old frame in place.
  4. Check the condition of the rough opening where the new frame will sit. Make sure it’s clear of debris and free from significant damage.
  5. If necessary, repair any damage such as rotting wood or uneven surfaces before proceeding.
  6. Measure both the width and height of your rough opening.
  7. Double-check that your replacement frame matches these dimensions.
  8. Place shims in key areas within the rough opening to ensure proper alignment.
  9. Position your new door frame carefully into place.
  10. Secure with nails or screws while checking for alignment after each step.
  11. Reinstall any trim pieces removed earlier or add new ones that match your aesthetic preference.
  12. Sand down edges where necessary before painting or staining for a polished finish.

When Should You Seek Professional Help?

Scenario Why Seek Professional Assistance?
Significant structural damage May involve complex repairs beyond basic skills
Non-standard size frames Custom fitting may require advanced carpentry
Lack of specialized tools Could slow progress significantly

If you’re unsure about handling specific challenges during replacement, don’t hesitate to consult an expert. It’s better to ensure quality than risk errors that could lead to more expenses down the line.

By evaluating your skills honestly and working methodically through each step with proper tools in hand, replacing a door frame yourself becomes an achievable DIY project tailored even for beginners looking to enhance their home improvement skills.


Comprehensive Guide to Door Repair Rockville, MD: Understanding Door and Frame Anatomy

Handyman with screwdriver repairing door lock indoors, closeup Handyman with screwdriver repairing door lock indoors, closeup Door installation stock pictures, royalty-free photos & images
Understanding the parts of a door and frame is essential when installing, repairing, or choosing a new door system for your home or building. A well-installed door not only enhances security but also adds aesthetic value. Below is an in-depth look at the various components that make up a door and its frame.

Key Components of a Door

  • Door Panel: The main part of the door, typically made from wood, metal, fiberglass, or composite materials. This panel could be solid or include decorative elements like glass inserts or panels.
  • Rails and Stiles: These are the horizontal (rails) and vertical (stiles) structural members that form the framework of most doors. They provide strength to the door panel.
  • Panels: In panel-style doors, these are flat or raised sections enclosed by rails and stiles.
  • Glazing: If the door includes glass elements for visibility or light transmission, this is referred to as glazing.

Essential Components of a Door Frame

Component Description
Jambs Vertical components on each side of the frame that support the weight of the door.
Head Jamb The horizontal piece at the top of the frame connecting both side jambs.
Sill/Threshold The bottom piece upon which the entire frame rests; often designed for weatherproofing.
Stop Molding Strips attached along jambs to prevent over-swinging or rattling when closed.

Other Supporting Elements

  1. Casing/Trim: Decorative molding placed around the edges where walls meet frames for aesthetic purposes.
  2. Weatherstripping: Materials used along edges to seal gaps against drafts and moisture.
  3. Door Sweep: A strip installed along the bottom edge to block airflow under doors.
  4. Hardware Anchors: Screws and brackets securing hinges into place within frames.

Importance of Knowing Door Anatomy

By understanding these key components: – You can better evaluate product quality during selection. – Maintenance becomes easier as you can identify specific parts needing repair. – Installation processes run smoothly with awareness about where each part fits.

Before undertaking any installation work, take time familiarizing yourself with both visible elements like panels as well as hidden features such as stops or weatherproofing systems integrated within frames.

Door Installation Rockville, MD: Hardware Essentials Like Handles, Hinges, and Locksets Explained

Understanding the essential hardware components of a door is crucial for both functionality and aesthetics. The right handles, hinges, and locksets not only enhance the usability of a door but also contribute to its overall security and visual appeal. Below is an in-depth guide to these key elements.

Door Handles: Types and Features

Door handles are one of the most noticeable hardware components on a door. They come in various types based on design and functionality.

  • Knobs: Traditional in design, knobs are spherical handles that can be turned to unlatch or secure a door. They are suitable for both interior and exterior doors but may require more grip strength compared to lever handles.
  • Levers: Lever-style handles offer practicality with an ergonomic design. They are easier to use for children, elderly individuals, or those with reduced hand mobility.
  • Passage Handles: These have no locking mechanism and are ideal for areas where security or privacy isn’t required (e.g., hallways or closets).
  • Privacy Handles: Equipped with simple locks, these handles are commonly used in bedrooms or bathrooms.
  • Entry Handles: Designed for exterior doors, these typically include keyed mechanisms for added security.

When selecting a handle type, it’s important to consider the intended use of the door as well as the architectural style of your space.

Hinges: Functionality Meets Durability

Hinges serve as pivotal support systems that attach the door to its frame while allowing controlled movement. Choosing the correct type ensures smooth operation and long-lasting performance.

Hinge Type Description Best Suited For
Butt Hinges Traditional two-leaf hinges; durable and strong Heavy wooden doors
Spring Hinges Automatically close doors after opening Kitchens or fire-rated entryways
Concealed Hinges Hidden when the door is closed Sleek modern designs
Pivot Hinges Mounted at the top and bottom instead of sides Large or heavy commercial doors

Ensure you consider hinge material (steel, brass, etc.) based on factors like climate (e.g., rust resistance in humid areas) or weight-bearing needs.

Locksets: Security Redefined

  1. Deadbolt Locks – Known for their high level of security, deadbolts operate with a key from outside and/or thumb-turn from inside.
  2. Mortise Locks – Installed within a pocket cut into the edge of a door; common in commercial spaces due to their robust build.
  3. Cylindrical Locks – Straightforward installation; often used alongside deadbolts for enhanced security.
  4. Electronic Locks – Incorporate keypads or smart technology like fingerprint access or integration with home automation systems.

For added protection on entry points, it may be worth combining different lock types such as pairing deadbolts with electronic locks.

Tips for Choosing Door Hardware

  • Match finishes across all hardware components (e.g., brushed nickel or oil-rubbed bronze).
  • Test ergonomics before purchasing; comfort is just as critical as durability.
  • Prioritize ANSI/BHMA grade-certified locks if security is paramount—Grade 1 offers maximum strength.

Investing time into understanding handles, hinges, and locksets can transform your doors into functional assets that align seamlessly with your lifestyle needs while enhancing safety measures throughout your homespaces.

Door Replacement Rockville, MD: Hardware Essentials Like Handles, Hinges, and Locksets Explained

Selecting the right hardware for your door is crucial for functionality, security, and aesthetics. Understanding the essentials—handles, hinges, and locksets—ensures you make informed decisions when installing or upgrading your doors. Below is a detailed breakdown of these components to guide you.

Handles: Style Meets Functionality

Handles serve both practical and decorative purposes. They are one of the most visible elements of a door and come in various styles to suit different needs and design preferences.

  • Knob Handles – Offers a classic look but can be harder to grip for children or those with limited hand mobility.
  • Lever Handles – User-friendly, making them ideal for homes with accessibility concerns.
  • Pull Handles – Commonly seen on sliding or commercial doors; offers a sleek modern appearance.
  • Materials Used:
    Handles are made from materials such as stainless steel, brass, chrome, or even wood. While stainless steel provides excellent durability and corrosion resistance, brass offers an elegant touch suitable for traditional designs.
  • Comfort in use
  • Compatibility with locking mechanisms
  • Finish that complements your door design

Hinges: The Backbone of Door Operation

Hinges enable doors to open and close smoothly while supporting their weight over time. The type and size of hinges required depend on the door’s material, size, and application.

  • Butt Hinges – Found on most residential doors; durable and simple in design.
  • Continuous (Piano) Hinges – Ideal for heavy-duty applications where support along the entire length is needed.
  • Concealed Hinges – Designed to offer a seamless look by hiding within the frame when the door is closed.
  • Stainless Steel: Corrosion-resistant and ideal for exterior doors.
  • Brass: Offers an appealing finish but not as robust as stainless steel.
  • Aluminum: Lightweight but not recommended for heavy doors.
Hinge Type Best Application Durability Rating (1-5)
Butt Hinge Residential interior 4
Continuous Hinge Commercial heavy-duty 5
Concealed Hinge Modern minimalist designs 3

Locksets: Ensuring Security

Locksets are critical for securing your home while enhancing ease of access where needed.

  • Deadbolts – Provide maximum security by extending a solid metal bolt into the frame.
  • Keyed Entry Locks – Typically used as part of knob or lever handles; they combine convenience with basic security features.
  • Smart Locks – Advanced systems allowing keyless entry via codes or mobile devices.
    • Level of security needed (e.g., deadbolt vs keypad).
    • Installation complexity (some smart locks may require professional setup).
    • Durability against wear-and-tear (look for ANSI Grade ratings).

Harmonizing Aesthetics and Functionality

1) Match finishes across all pieces for consistency (e.g., brushed nickel handles with similar-finish hinges). 2) Ensure compatibility between handle types & lock mechanisms especially multi-door setups like French entrances.

Proper understanding allows selection optimal solutions balancing strength beauty security effectively

Durable and Reliable Door Frames for Homes in Doors Rockville, MD

Choosing the right material for a door frame is essential for durability, aesthetics, and functionality. Each material has its unique characteristics, strengths, and limitations. Below is a detailed exploration of the most common materials used for door frames to help you make an informed decision.

1. Wood

Wood is one of the most traditional and widely used materials for door frames due to its timeless appeal and versatility.

Advantages: – Aesthetic flexibility: Easily painted or stained to match interior or exterior decor. – Variety: Comes in softwoods (e.g., pine) and hardwoods (e.g., oak, mahogany). – Insulation: Provides natural thermal and sound insulation.

Limitations: – Susceptible to moisture damage such as warping or rotting if not properly sealed. – Requires regular maintenance over time to maintain appearance and durability.

Type of Wood Best Use Key Benefit
Pine Interior doors Affordable and lightweight
Mahogany Exterior doors High durability against pests
Oak Both interior/exterior Long-lasting with a classic look

2. Steel

Steel door frames are known for their strength, making them an excellent choice for security-focused applications.

Advantages: – High durability: Resistant to impacts, warping, and extreme weather conditions. – Low maintenance: Requires minimal upkeep compared to wood. – Fire resistance: Often meets fire safety standards when paired with fire-rated doors.

Limitations: – Prone to rust if exposed to moisture without proper treatment. – Limited design options compared to wood or fiberglass.

Steel frames are ideal for commercial buildings or environments requiring enhanced security.

3. Aluminum

Aluminum is a lightweight yet durable option often found in modern-style homes or commercial projects.

Advantages: – Corrosion-resistant when treated with anodizing or powder-coating finishes. – Sleek appearance that complements contemporary designs. – Low maintenance with long-term reliability.

Limitations: – Not as strong as steel; may dent under heavy impact. – Less insulating unless paired with thermal breaks or other insulating treatments.

Aluminum frames are often chosen for sliding glass doors, storefronts, or minimalist architectural styles.

4. Fiberglass

Fiberglass door frames offer a balance of strength, insulation, and design flexibility.

Advantages: – Weatherproof: Resists moisture damage better than wood. – Energy-efficient due to excellent insulation properties. – Available in finishes that mimic the appearance of wood without its drawbacks.

Limitations: – Higher cost compared to some materials like aluminum or basic woods. – May not be as widely available in custom designs as other materials.

Fiberglass works well in areas with extreme temperature fluctuations since it doesn’t expand or contract significantly under changing conditions.

5. uPVC (Unplasticized Polyvinyl Chloride)

uPVC is increasingly popular in residential applications due to its affordability and low-maintenance qualities.

Advantages: – Highly weather-resistant; will not rot, warp, peel, or corrode over time. – Cost-effective option compared to wood or aluminum. – Good insulating properties for energy efficiency.

Limitations: – Less eco-friendly than natural materials like wood since it’s derived from plastic. – Can discolor over time when exposed directly to sunlight unless UV-stabilized coatings are used.

uPVC frames are often selected for windows but work equally well in external door applications where budget constraints exist without sacrificing utility.

Choosing the Right Material

The selection of material depends on various factors: 1. Budget: Hardwood like mahogany may be costly but lasts longer than softwood options like pine. Similarly, fiberglass may require higher upfront costs but offers superior longevity and efficiency benefits over time. 2. Climate: Moisture-prone regions benefit from corrosion-resistant options like aluminum or fiberglass rather than untreated wood which can warp easily in such environments. 3. Aesthetic Preferences: Materials like wood provide unmatched warmth while aluminum offers sleek minimalism suitable only within modern spaces where such looks align appropriately toward household goals/designs etc .

By understanding these aspects alongside specific requirements either functional stylistic practical-solve complex architectural challenges effectively ensuring satisfaction overall usage longevity economics balanced across needs priorities .

Man hands using spray gun and filling gap with construction foam between new door and wall. Closeup. Repair work of home. Renovation process. Man hands using spray gun and filling gap with construction foam between new door and wall. Closeup. Repair work of home. Renovation process. Door installation stock pictures, royalty-free photos & images

Step-by-Step Guide to Installing a New Door for Your Home

Installing a new door can enhance the aesthetics, security, and energy efficiency of your home. Whether you’re replacing an old door or installing one for the first time, following a structured approach will ensure a professional result. Here’s a guide to help you through the process.

Tools and Materials You Will Need

Tools: – Measuring tape
– Level
– Screwdriver or power drill
– Hammer
– Pry bar
– Saw (if adjustments are needed)

Materials: – Pre-hung door or slab door (depending on your project)
– Shims
– Screws and nails
– Insulation or caulk
– Wood filler (optional for touch-ups)

Preparing for Installation

  1. Measure the Door Opening: Begin by accurately measuring the door frame’s width, height, and depth. This ensures you choose a door that fits snugly without gaps.
  2. Inspect the Door Frame: Check that the frame is square and level. If it’s warped or damaged, make necessary repairs before installing the new door.
  3. Remove Existing Door (if applicable): Use a hammer and pry bar to remove trim, hinges, and any hardware from the old door.

Installing a Pre-Hung Door

A pre-hung door includes both the slab (door itself) and frame, making it easier to install.

  1. Position the Door Frame: Place the pre-hung unit into the opening. Ensure it is centered with equal spacing around all sides.
  2. Level and Plumb: Use shims to adjust both sides of the frame until it’s perfectly level and plumb (vertically straight).
  3. Secure Hinges: Once positioned correctly, secure hinges on one side using screws but avoid over-tightening initially.
  4. Fasten Frame to Wall: Drive screws through pre-drilled holes in the frame into wall studs while maintaining alignment with shims.
  5. Check Fitment: Open and close the door multiple times to confirm smooth operation without sticking or binding.

Adjusting a Slab Door Installation

  1. Align hinge mortises on both replacement slab & existing jambs during placement preparations.Wrap

Exploring the Expertise of a Door Company in Rockville, MD for Quality Installations

The threshold is a seemingly small but vital component of door installation that plays a significant role in the functionality, durability, and efficiency of a door system. Often overlooked, thresholds contribute to security, energy efficiency, and accessibility. This section provides an in-depth understanding of thresholds and why they are indispensable for successful door installations.

What is a Threshold?

A threshold is the bottom part of a door frame that runs horizontally across the floor beneath the door itself. It acts as a transition between different flooring materials or spaces while also serving practical purposes such as sealing and protecting the entryway.

Functions of Thresholds

  • Seal Against Elements: They prevent drafts, water intrusion, dirt, and debris from entering the home by creating an airtight seal.
  • Enhance Energy Efficiency: By minimizing gaps under doors, thresholds reduce heat loss during colder months and help maintain indoor temperatures during summer.
  • Improve Accessibility: Certain thresholds are designed to meet Americans with Disabilities Act (ADA) accessibility standards by providing low-profile or ramped options for smooth transitions.
  • Structural Support: They reinforce the integrity of the door frame by bearing some weight and connecting both sides of the frame.

Types of Door Thresholds

Type Description Ideal Use Cases
Standard Threshold A basic design commonly found in residential applications. Homes with simple entryways.
Adjustable Threshold Allows height adjustment to accommodate variations in flooring or settle over time. Homes prone to floor movement.
Thermal Break Threshold Features insulation to prevent heat transfer through metal components. Energy-efficient homes/climates.
Saddle Threshold Raised center design for improved weather resistance or access control. Exterior doors exposed to rain.
ADA-Compliant Threshold Low-profile or beveled transitions designed for wheelchair accessibility. Commercial buildings or ramps.

Choosing the Right Material

  • Aluminum: Lightweight yet strong; resistant to corrosion but may conduct heat.
  • Wood: Offers aesthetic appeal but requires sealing against moisture.
  • Vinyl/Composite: Affordable and weather-resistant but less durable than metal options.
  • Brass/Bronze: Premium metals offering excellent corrosion resistance and style.

Installation Best Practices

  1. Measure Accurately: Measure both width and height from side jambs to determine proper fit.
  2. Sealant Application: Apply waterproof adhesive or caulk underneath before securing to block water ingress.
  3. Secure Fasteners Correctly: Attach using screws at pre-drilled holes without over-tightening to avoid distortion.
  4. Test Fit with Door Sweep/Gasket: Ensure compatibility between threshold height and any installed seals on your door bottom.

Maintenance Tips for Longevity

  • Inspect regularly for gaps caused by wear or shifting floors.
  • Clean debris buildup along edges using mild soap solutions.
  • Reapply sealant if necessary after prolonged exposure to harsh weather.

By understanding their critical role in preventing energy loss, enhancing security, improving accessibility, and adding durability against elements like rainwater intrusion—thresholds prove themselves as essential components within every successful door installation project.